Elements Of Electromagnetics
7th Edition
ISBN: 9780190698614
Author: Sadiku, Matthew N. O.
Publisher: Oxford University Press
expand_more
expand_more
format_list_bulleted
Concept explainers
Question
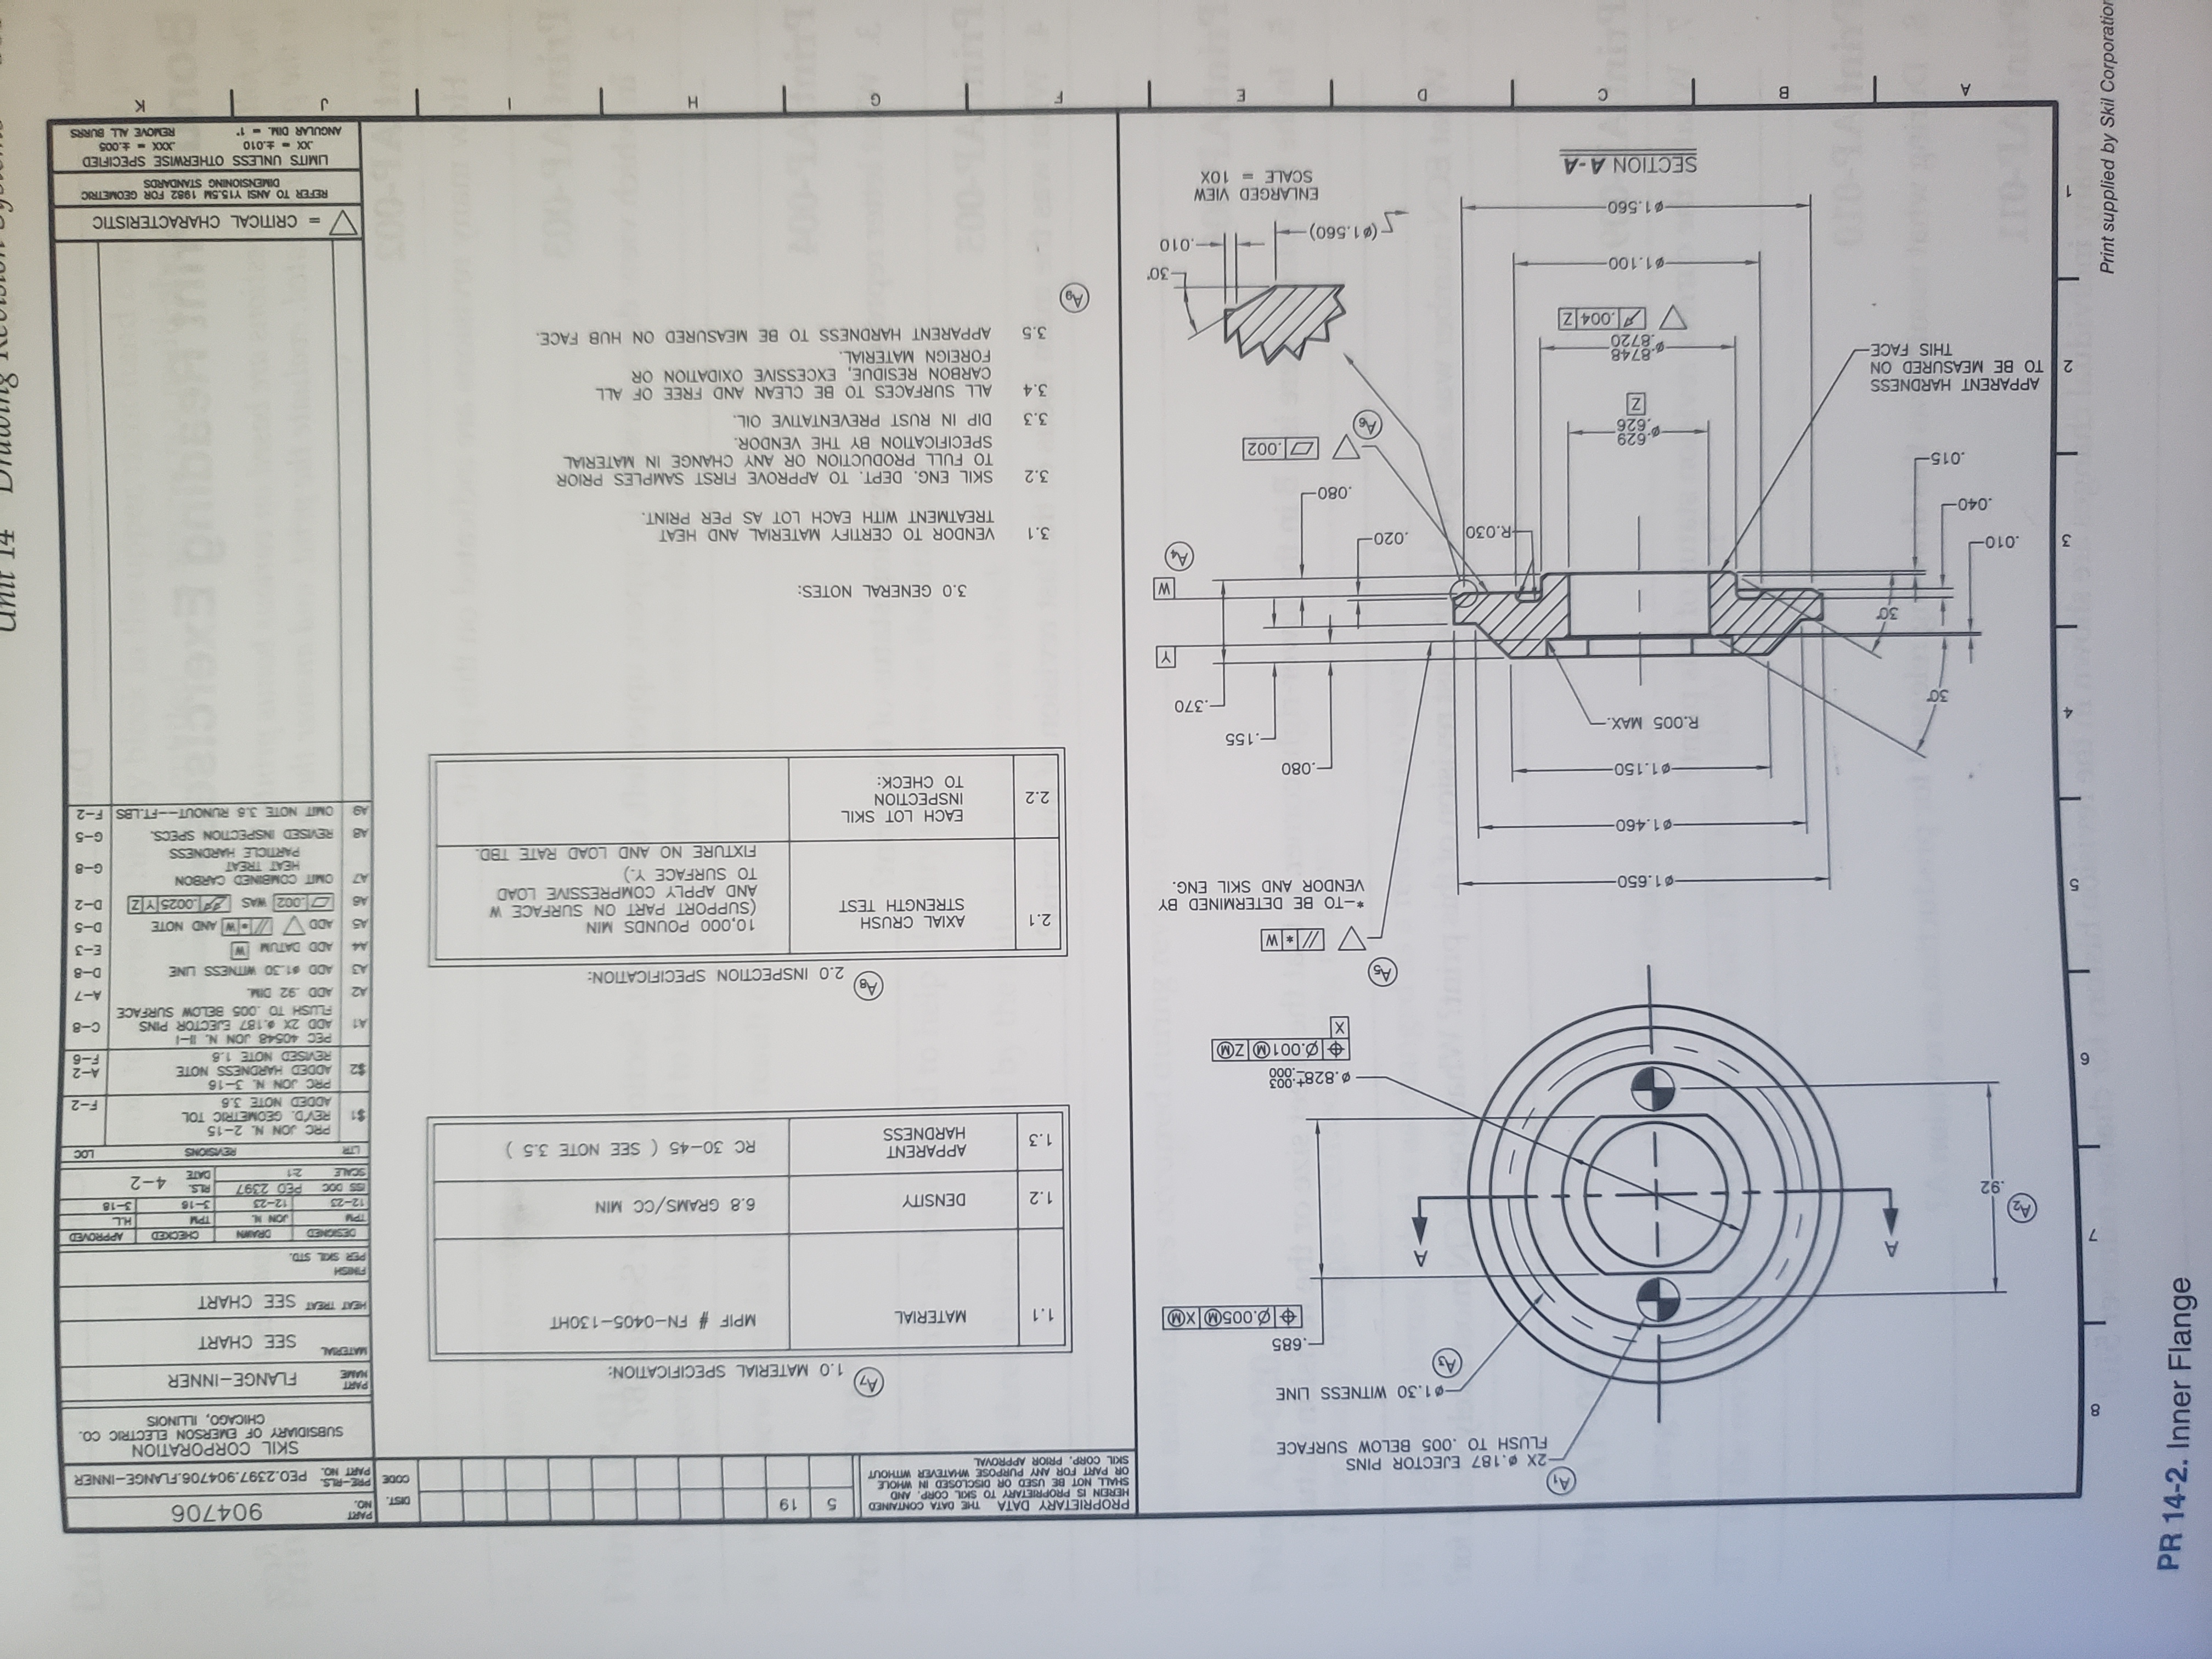
I need answers to questions 4, 5, and 6 pertaining to the print provided.
Note: A tutor keeps putting 1 question into 3 parts and wasted so many of my questions. Never had a issue before until now, please allow a different tutor to answer because I was told I am allowed 3 of these questions.

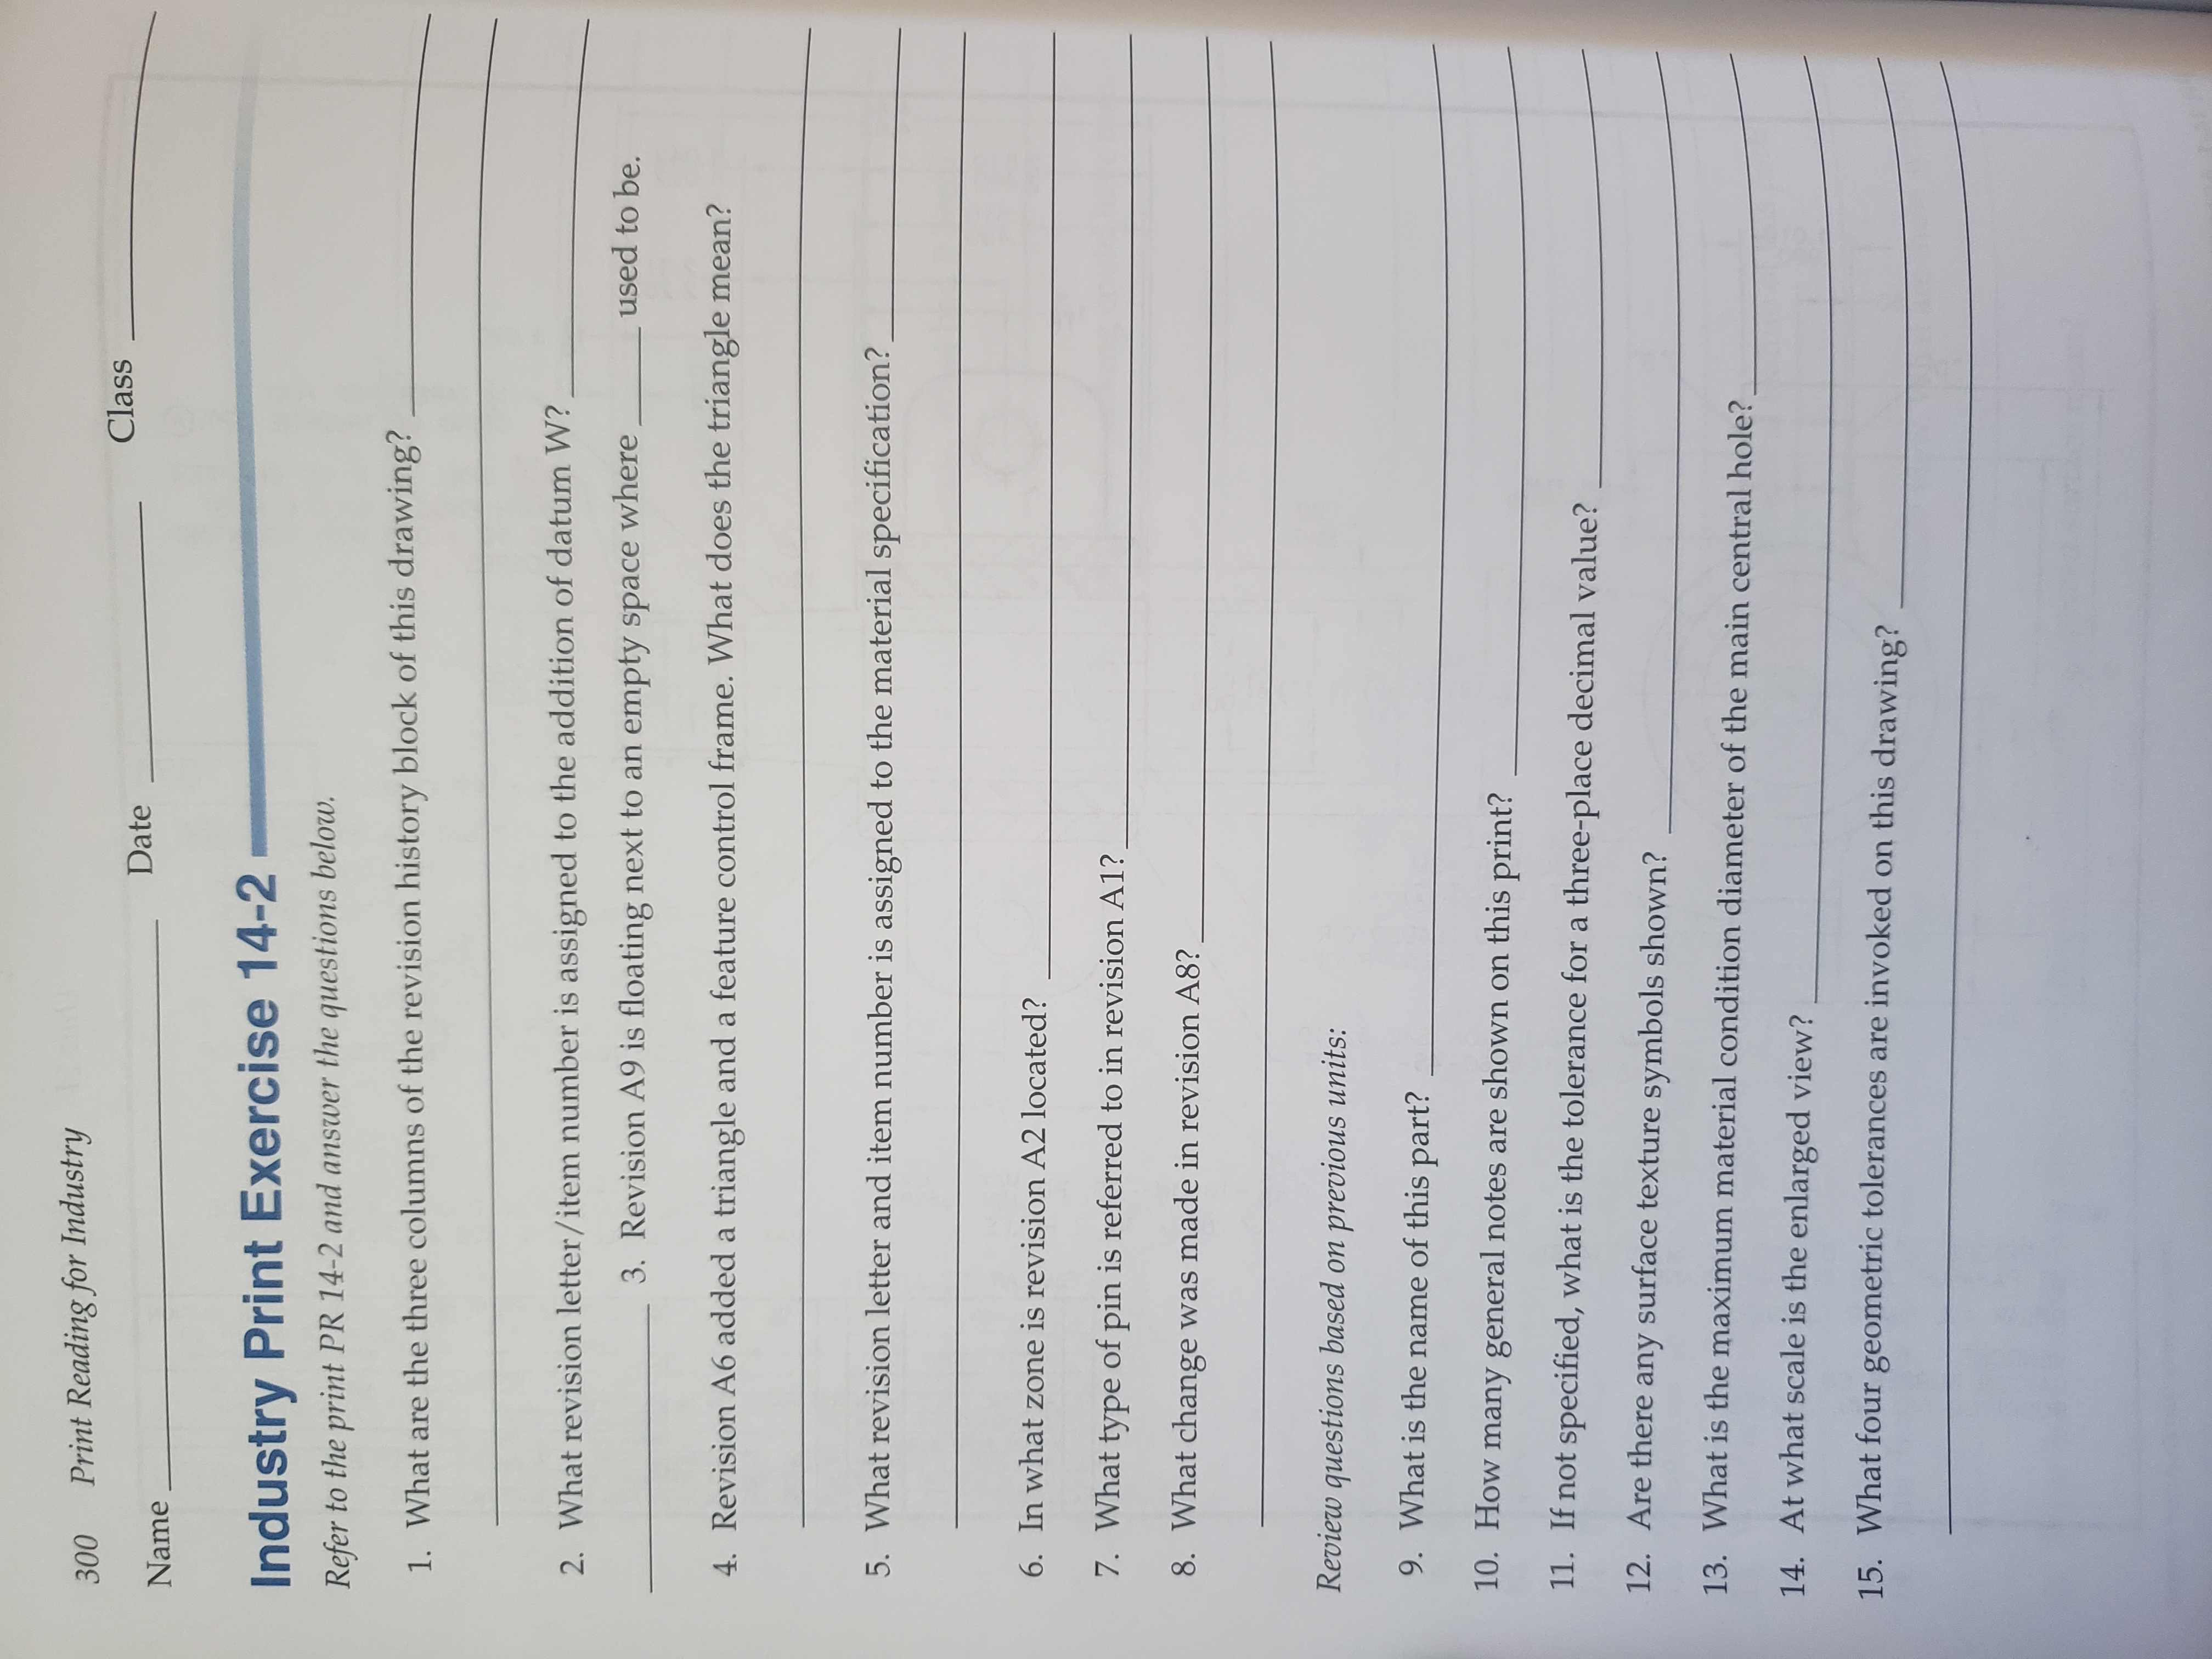
Transcribed Image Text:030
Print Reading for Industry
Class
Date
Name
Industry Print Exercise 14-2
Refer to the print PR 14-2 and answer the questions below.
1. What are the three columns of the revision history block of this drawing?
2. What revision letter/item number is assigned to the addition of datum W?
used to be.
3. Revision A9 is floating next to an empty space where
Revision A6 added a triangle and a feature control frame. What does the triangle mean?
5. What revision letter and item number is assigned to the material specification?
6. In what zone is revision A2 located?
7. What type of pin is referred to in revision A1?
8. What change was made in revision A8?
Review questions based on previous units:
9. What is the name of this
part?
10. How many general notes are shown on this print?
11. If not specified, what is the tolerance for a three-place decimal value?
12. Are there
any surface texture symbols shown?
13. What is the maximum material condition diameter of the main central hole?
14. At what scale is the enlarged view?
15. What four geometric tolerances are invoked on this drawing?

Transcribed Image Text:PROPRIETARY DATA
HEREIN IS PROPRIETARY TO SKIL CORP. AND
SHALL NOT BE USED OR DISCLOSED IN WHOLE
OR PART FOR ANY PURPOSE WHATEVER WITHOUT
SKIL CORP. PRIOR APPROVAL
PART
THE DATA CONTAINED
ON
PRE-RLS
DIST.
619
900 00
-2X.187 EJECTOR PINS
FLUSH TO .005 BELOW SURFACE
3000
PART NO. PEO.2397.904706.FLANGE-INNER
SKIL CORPORATION
SUBSIDIARY OF EMERSON ELECTRIC CO.
CHICAGO, ILLNOIS
CO
1.30 WITNESS LINE
PART
MAME
FLANGE-INNER
1.0 MATERIAL SPECIFICATION:
.685
MATERIAL
SEE CHART
.005M XM
MPIF # FN-0405-130HT
MATERIAL
1.1
HEAT TREAT SEE CHART
A
HSNS
DRAWN
CENDS
CEDKX
H.L
6.8 GRAMS/CC MIN
92
DENSITY
NNO
1.2
3-16
3-18
12-23
12-23
PED 2397
RLS.
4-2
SCALE
21
E
APPARENT
HARDNESS
RC 30-45 (SEE NOTE 3.5)
REVISIONS
1.3
PRC JON N 2-15
REVD. GEOMETRIC TOL
ADDED NOTE 3.6
$1
F-2
B.828+.003
000
PRC JON N. 3-16
ADDED HARDNESS NOTE
$2
REVISED NOTE 1.8
PEC 40548 JON N.
ADD 2X %.187 EJECTOR PINS
A-2
OZL00
9-3
X
A1
FLUSH TO .005 BELOW SURFACE
C-8
BV
2.0 INSPECTION SPECIFICATION:
A-7
ADD $1.30 WITNESS LINE
D-8
E-3
ADD DATUM W
10,000 POUNDS MIN
(SUPPORT PART ON SURFACE W
AND APPLY COMPRESSIVE LOAD
TO SURFACE Y.)
FIXTURE NO AND LOAD RATE TBD.
AXIAL CRUSH
STRENGTH TEST
2.1
D-5
A5
*-TO BE DETERMINED BY
VENDOR AND SKIL ENG.
002 WAS 0025 YZ
D-2
1.650-
NOB CANNIERG MI
G-8
HEAT TREAT
PARTICLE HARDNESS
REVISED INSPECTION SPECS.
-01.460-
G-5
AB
EACH LOT SKIL
INSPECTION
TO CHECK:
OMIT NOTE 3.6 RUNOUT-FT.LBS F-2
2.2
1.150-
.080
-.155
R.005 MAX.-
.370
3.0 GENERAL NOTES:
.010-
3
.020
R.030
3.1
VENDOR TO CERTIFY MATERIAL AND HEAT
TREATMENT WITH EACH LOT AS PER PRINT.
.040
.080
3.2 SKIL ENG. DEPT. TO APPROVE FIRST SAMPLES PRIOR
015
TO FULL PRODUCTION OR ANY CHANGE IN MATERIAL
SPECIFICATION BY THE VENDOR.
629
626
3.3 DIP IN RUST PREVENTATIVE OIL
APPARENT HARDNESS
2 TO BE MEASURED ON
THIS FACE
3.4 ALL SURFACES TO BE CLEAN AND FREE OF ALL
CARBON RESIDUE, EXCESSIVE OXIDATION OR
FOREIGN MATERIAL.
.8748
8720
.004 Z
3.5 APPARENT HARDNESS TO BE MEASURED ON HUB FACE.
1.100-
-010
01.560)
1.560-
= CRITICAL CHARACTERISTIC
ENLARGED VIEW
SCALE 10X
REFER TO ANSI Y15.5M 1982 FOR GEOMETRIC
DIMENSIONING STANDARDS
SECTION A-A
LIMITS UNLESS OTHERWISE SPECIFIED
XXX t.005
REMOVE ALL BURRS
X-.010
ANGULAR DIM.- 1
H
9 2 *2 2
Print supplied by Skil Corporatior
PR 14-2. Inner Flange
Expert Solution
This question has been solved!
Explore an expertly crafted, step-by-step solution for a thorough understanding of key concepts.
This is a popular solution
Trending nowThis is a popular solution!
Step by stepSolved in 3 steps

Knowledge Booster
Learn more about
Need a deep-dive on the concept behind this application? Look no further. Learn more about this topic, mechanical-engineering and related others by exploring similar questions and additional content below.Similar questions
- Please double check before rejecting this question. If it needs to be rejected, please explain why as I cannot see how this is a breach of the honor code. This is a questions from the previous year's exam at my university in Engineering Science. I have submitted a solution given to us for study purposes as proof that I will not be graded on this assessment. In this solution, the formula (2gh)1/2 is used to find the solution, but I am on familliar with Bernoulli's Principle (P=1/2pv^2+pgh), and I was not able to find a solution using this. My solution incurred an error when I found that I had two unkown variables left that I could not break down in any meaningful way. (Velocity being the desired variable, Pressure being the problematic variable). Pressure = Force x Area, but I don't know enough about the dimensions of the tank or tap to be able to understand this. Thank you for your help.arrow_forwardQuestion 3 You are working on a design team at a small orthopaedic firm. Your team is starting to work on a lower limb (foot-ankle) prosthesis for individuals who have undergone foot amputation (bone resection at the distal tibia). You remember hearing about "osseointegration" in an exciting orthopaedic engineering class you attended at Clemson, so you plan to attach the foot prosthesis using a solid metal rod inserted into the distal tibia. You think stainless steel or titanium alloy might be a useful rod material. You decide to begin this problem by identifying typical tibial bone anatomy and mechanical behavior (as provided in the tables and image below). You assume the tibial bone can be modeled as a hollow cylinder of cortical bone, as represented in the image. You anticipate the length of the rod will be 1/2 the length of the tibia. Q3G: Critical Thinking: What would you propose to your team as the next step in this analysis? Is it reasonable to assume the rod will experience the…arrow_forwardI need help answering this Review Activityarrow_forward
- J 6arrow_forward! Required information NOTE: This is a multi-part question. Once an answer is submitted, you will be unable to return to this part. At an intersection car B was traveling south and car A was traveling 30° north of east when they slammed into each other. Upon investigation, it was found that after the crash, the two cars got stuck and skidded off at an angle of 10° north of east. Each driver claimed that he was going at the speed limit of 50 km/h and that he tried to slow down, but couldn't avoid the crash because the other driver was going a lot faster. The masses of cars A and B were 1500 kg and 1200 kg, respectively. 10° 30° VR Determine the speed of the faster of the two cars if the slower car was traveling at the speed limit. The speed of the faster car was km/h.arrow_forwardI need answers for problems 13, 14, and 15 pertaining to the print provided. NOTE: If you refuse to answers all 3 parts and insist on wasting my question by breaking down 1 simple question into 3 parts, then just leave it for someone else to answer. Thank you.arrow_forward
- Help!!! Please answer all Correctly!!! Pleasearrow_forwardI need answers to questions 1, 2, and 3 pertaining to the print provided. Note: A tutor keeps putting 1 question into 3 parts and wasted so many of my questions. Never had a issue before until now, please allow a different tutor to answer because I was told I am allowed 3 of these questions.arrow_forwardADVANCED CHEMISTRY! RATE WILL BE GIVEN! PLEASE WRITE THE COMPLETE SOLUTIONS A Steam at 400 deg C an 8,200 kilo Pascals enters a turbine and leaves at 10 kPa. What is the entropy of the leaving steam if the efficiency of the turbine is 0.76. Round the answers in to 2 decimal places. Hint: Turbine's efficiency is the ratio of work delivered by the actual turbine to the work delivered by an isentropic turbine (no entropy change) H (kJ/kg) S (kj/kg-K) 8200 kPa, 400 degrees 3137.6 6.3534 10 kPa, sat. liquid 191.832 0.6493 10 kPa, sat. vapor 2584.8 8.1511arrow_forward
- I asked for problems 6 and 7 to be answered, but I did not get a properly structured answered as the example shows on problem number 1. Here is the link to the questions I already had answered, could you please rewrite the answer so its properly answered as the example shows (Problem 1)? https://www.bartleby.com/questions-and-answers/it-vivch-print-reading-for-industry-228-class-date-name-review-activity-112-for-each-local-note-or-c/cadc3f7b-2c2f-4471-842b-5a84bf505857arrow_forwardI need these three parts answered, if you are unable to answer all three parts please leave it for another tutor to answer, thank you.arrow_forwardStatics of Rigid Bodies Note: If you have already answered the problems in this post, kindly ignore it. If not, then answer it. Thank you, Tutor! Content Covered: - Method of Joints Direction: Create two problems based on the topic "Method of Joints" and then solve them with a complete solution. In return, I will give you a good rating. Thank you so much! Note: Please bear in mind to create two problems based on the topic "Method of Joints." Be careful with the calculations in the problem. Kindly double check the solution and answer if there is a deficiency. And also, box the final answer. Thank you so much!arrow_forward
arrow_back_ios
SEE MORE QUESTIONS
arrow_forward_ios
Recommended textbooks for you
 Elements Of ElectromagneticsMechanical EngineeringISBN:9780190698614Author:Sadiku, Matthew N. O.Publisher:Oxford University Press
 Mechanics of Materials (10th Edition)Mechanical EngineeringISBN:9780134319650Author:Russell C. HibbelerPublisher:PEARSON
 Thermodynamics: An Engineering ApproachMechanical EngineeringISBN:9781259822674Author:Yunus A. Cengel Dr., Michael A. BolesPublisher:McGraw-Hill Education
 Control Systems EngineeringMechanical EngineeringISBN:9781118170519Author:Norman S. NisePublisher:WILEY
 Mechanics of Materials (MindTap Course List)Mechanical EngineeringISBN:9781337093347Author:Barry J. Goodno, James M. GerePublisher:Cengage Learning
 Engineering Mechanics: StaticsMechanical EngineeringISBN:9781118807330Author:James L. Meriam, L. G. Kraige, J. N. BoltonPublisher:WILEY

Elements Of Electromagnetics
Mechanical Engineering
ISBN:9780190698614
Author:Sadiku, Matthew N. O.
Publisher:Oxford University Press

Mechanics of Materials (10th Edition)
Mechanical Engineering
ISBN:9780134319650
Author:Russell C. Hibbeler
Publisher:PEARSON

Thermodynamics: An Engineering Approach
Mechanical Engineering
ISBN:9781259822674
Author:Yunus A. Cengel Dr., Michael A. Boles
Publisher:McGraw-Hill Education

Control Systems Engineering
Mechanical Engineering
ISBN:9781118170519
Author:Norman S. Nise
Publisher:WILEY

Mechanics of Materials (MindTap Course List)
Mechanical Engineering
ISBN:9781337093347
Author:Barry J. Goodno, James M. Gere
Publisher:Cengage Learning

Engineering Mechanics: Statics
Mechanical Engineering
ISBN:9781118807330
Author:James L. Meriam, L. G. Kraige, J. N. Bolton
Publisher:WILEY